UEFI PXE Secure Boot
October 6, 2023Less than 1 minuteReferenceUEFI PXE Secure Boot
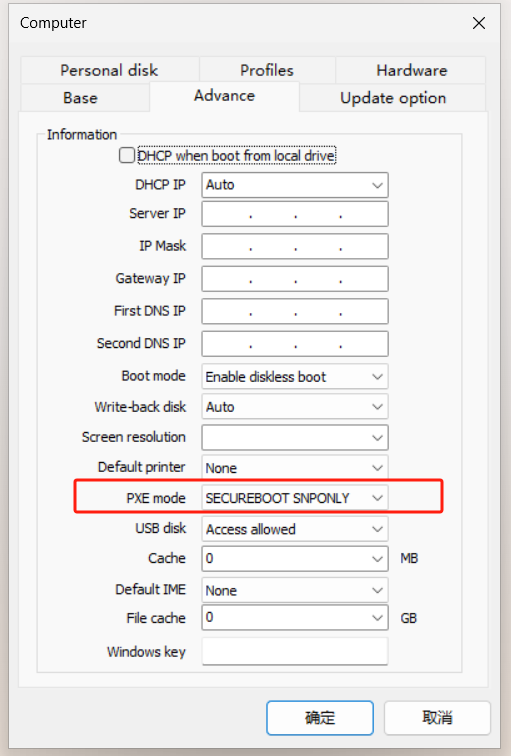
Settings in server
- Set pxe boot mode to SECUREBOOT SNPONLY or SECUREBOOT IPXE.
- If the above PXE boot options are not available, Please download the signed snponly.efi file and copy the snponly.efi file to the cloud desktop server installation directory, for example, C:\Program Files\iscsidiskServer\

- Restart the iscsidisk service and edit the computer's pxe boot mode to uefi snponly.
Setting in client computer
If the server is already set to SECUREBOOT SNPONLY or SECUREBOOT IPXE boot mode, you can directly secure boot. No other settings are required.
If the above server PXE boot options are not available, register the VMware certificate in UEFI firmware.
Download and copy vmware_esx40.der and vmware_sb2017.der to usb and reboot client computer into BIOS.
 |  |
|---|
- Enable Secure Boot, select OS Type to “Windows UEFI mode”

- Enter Key Management, DB Management, to add your centificate “vmware_esx40.der”, “vmware_sb2017.der”.


!Note: You may be asked for a SignatureOwner GUID when you enroll the VMware certificate. Secure Boot will function correctly no matter what GUID you use, but VMware suggests using the GUID a3d5e95b-0a8f-4753-8735-445afb708f62 in order to identify VMware as the owner of the certificate. ( https://kb.vmware.com/s/article/2148532?lang=en_US )


- Last save bios and confirm Secure boot state is enable.


- Please use GPT system image to test uefi pxe secure boot


- If you see this warning, please check that the above steps are set up correctly.
